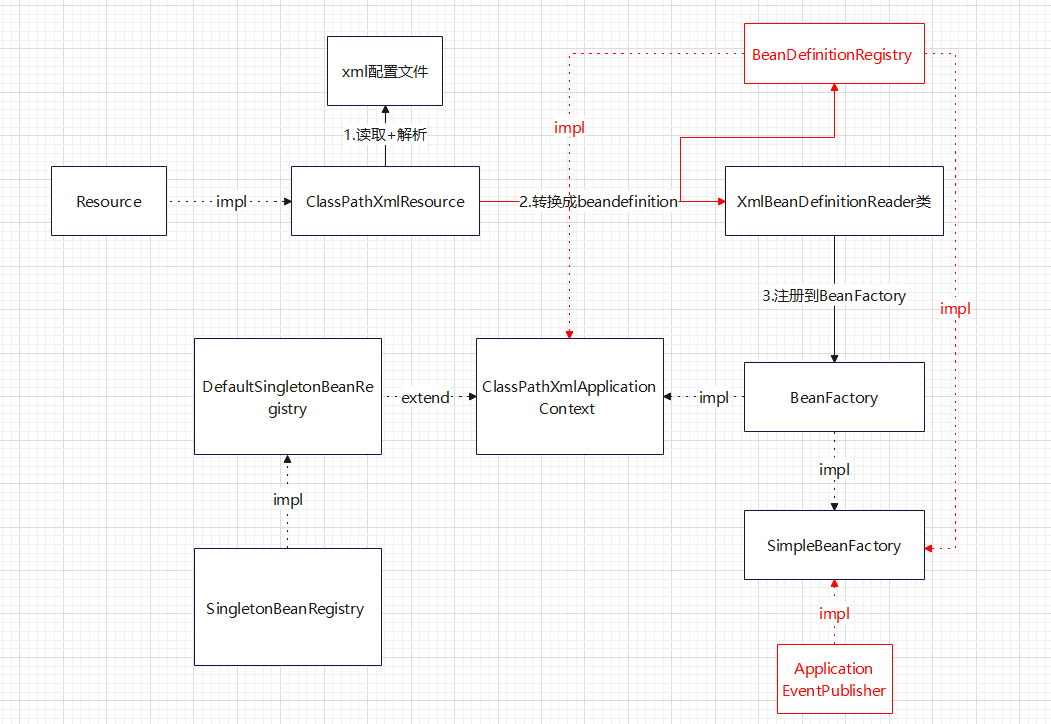
在前面主要是实现了Bean的拓展,如图。
接下来要做的事情是实现依赖注入。
回顾DI 首先,我们要定义在 XML 配置文件中使用 setter 注入和构造器注入的配置方式。
Setter 注入 是提供了一个 setter 方法,调用 setXXX() 来注入值。
constructor 就是在构造器 / 构造函数里传入参数来进行注入。
先看一下在Spring中如何实现的依赖注入 :
setter注入 :配置bean时为属性赋值,property标签
1
2
3
4
5
6
7
<bean id="studentOne" class="com.atguigu.spring.bean.Student" > <!-- property标签:通过组件类的setXxx()方法给组件对象设置属性 --> <!-- name属性:指定属性名(这个属性名是getXxx()、setXxx()方法定义的,和成员变量无关)--> <!-- value属性:指定属性值 --> <property name="id" value="1001" ></property> <property name="name" value="张三" ></property> </bean>
由上面的示例可以看出,我们在 标签下引入了 标签,它又包含了 type、name 和 value,分别对应属性类型、属性名称以及赋值。
构造器注入(需要添加有参构造),constrcutor标签
先添加有参构造
1
2
3
4
5
6
7
8
public Student (Integer id, String name) { this .id = id; this .name = name; } public Student (Integer sorce, String name) { this .sorce = sorce; this .name = name; }
再注入
1 2 3 4 5 6 7 8 <bean id ="studentTwo" class ="com.atguigu.spring.bean.Student" > <constructor-arg value ="1002" > </constructor-arg > <constructor-arg value ="李四" > </constructor-arg > </bean >
或
1 2 3 4 5 6 7 <beans > <bean id ="aservice" class ="com.minis.test.AServiceImpl" > <constructor-arg type ="String" name ="name" value ="abc" /> <constructor-arg type ="int" name ="level" value ="3" /> </bean > </beans >
实现属性类 通过前面回顾DI中两种不同的配置方式的实现,我们发现其实构造器注入与 Setter 注入类似,我们只是把 标签换成了 标签。
那么注入操作的本质,就是给 Bean 的各个属性进行赋值。
那么我们要通过 和 标签实现注入依赖,就要去定义对应的属性类。
也就是要为标签下的 和 写实现类,分别叫PropertyValue类和ArgumentValue类。
PropertyValue类 1 2 3 4 5 6 7 8 9 10 11 12 13 14 package com.minis.beans;public class PropertyValue { private final String type; private final String name; private final Object value; public PropertyValue (String type, String name, Object value) { this .type = type; this .name = name; this .value = value; } }
针对的某一个属性或者某一个参数,但一个 Bean 里面有很多属性、很多参数,所以我们就需要一个带“s”的集合类。
在 Spring 中也是这样的,所以参考 Spring 的方法,提供了 PropertyValues 类,封装、 增加、获取、判断等操作方法,简化调用。
既给外面提供单个的参数 / 属性的对象,也提供集合对象。
1 2 3 4 5 6 7 8 9 10 11 12 13 14 15 16 17 18 19 20 21 22 23 24 25 26 27 28 29 30 31 32 33 34 35 36 37 38 39 40 41 42 43 44 45 public class PropertyValues { private final List<PropertyValue> propertyValueList; public PropertyValues () { this .propertyValueList = new ArrayList <>(0 ); } public List<PropertyValue> getPropertyValueList () { return this .propertyValueList; } public int size () { return this .propertyValueList.size(); } public void addPropertyValue (PropertyValue pv) { this .propertyValueList.add(pv); } public void addPropertyValue (String propertyName, Object propertyValue) { addPropertyValue(new PropertyValue (propertyName, propertyValue)); } public void removePropertyValue (PropertyValue pv) { this .propertyValueList.remove(pv); } public void removePropertyValue (String propertyName) { this .propertyValueList.remove(getPropertyValue(propertyName)); } public PropertyValue[] getPropertyValues() { return this .propertyValueList.toArray(new PropertyValue [this .propertyValueList.size()]); } public PropertyValue getPropertyValue (String propertyName) { for (PropertyValue pv : this .propertyValueList) { if (pv.getName().equals(propertyName)) { return pv; } } return null ; } public Object get (String propertyName) { PropertyValue pv = getPropertyValue(propertyName); return pv != null ? pv.getValue() : null ; } public boolean contains (String propertyName) { return getPropertyValue(propertyName) != null ; } public boolean isEmpty () { return this .propertyValueList.isEmpty(); } }
ArgumentValue类 1 2 3 4 5 6 7 8 9 10 11 12 13 14 15 16 public class ArgumentValue { private Object value; private String type; private String name; public ArgumentValue (Object value, String type) { this .value = value; this .type = type; } public ArgumentValue (Object value, String type, String name) { this .value = value; this .type = type; this .name = name; } }
同 PropertyValues 类,这里也有一个ArgumentValues类
1 2 3 4 5 6 7 8 9 10 11 12 13 14 15 16 17 18 19 20 21 22 23 24 25 26 27 28 29 30 31 32 package com.minis.beans;import java.util.*;public class ArgumentValues { private final List<ArgumentValue> argumentValueList = new ArrayList <ArgumentValue>(); public ArgumentValues () { } public void addArgumentValue (ArgumentValue argumentValue) { this .argumentValueList.add(argumentValue); } public ArgumentValue getIndexedArgumentValue (int index) { ArgumentValue argumentValue = this .argumentValueList.get(index); return argumentValue; } public int getArgumentCount () { return (this .argumentValueList.size()); } public boolean isEmpty () { return (this .argumentValueList.isEmpty()); } }
解析标签 这里说的标签就是 和 。
要在 XmlBeanDefinitionReader 类中处理这两个标签。
看看XmlBeanDefinitionReader 的变化:
1
2
3
4
5
6
7
8
9
10
11
12
13
14
15
16
17
18
19
20
21
22
23
24
25
26
27
28
29
30
31
32
33
34
35
36
37
38
39
40
41
42
43
44
45
public class XmlBeanDefinitionReader { SimpleBeanFactory simpleBeanFactory; public XmlBeanDefinitionReader (SimpleBeanFactory simpleBeanFactory) { this .simpleBeanFactory = simpleBeanFactory; } public void loadBeanDefinitions (Resource resource) { while (resource.hasNext()) { Element element = (Element) resource.next(); String beanID = element.attributeValue("id" ); String beanClassName = element.attributeValue("class" ); BeanDefinition beanDefinition = new BeanDefinition (beanID, beanClassName); List<Element> propertyElements = element.elements("property" ); PropertyValues PVS = new PropertyValues (); for (Element e : propertyElements) { String pType = e.attributeValue("type" ); String pName = e.attributeValue("name" ); String pValue = e.attributeValue("value" ); PVS.addPropertyValue(new PropertyValue (pType, pName, pValue)); } beanDefinition.setPropertyValues(PVS); List<Element> constructorElements = element.elements("constructor-arg" ); ArgumentValues AVS = new ArgumentValues (); for (Element e : constructorElements) { String pType = e.attributeValue("type" ); String pName = e.attributeValue("name" ); String pValue = e.attributeValue("value" ); AVS.addArgumentValue(new ArgumentValue (pType,pName,pValue)); } beanDefinition.setConstructorArgumentValues(AVS); this .simpleBeanFactory.registerBeanDefinition(beanID,beanDefinition); } } }
本来是在xml中读取Bean的ID和Class,再去BeanDefinition注册就行了。
现在要分别读取”property”和”constructor-arg”两个标签,并进行标签内内容的遍历。读取type、name、value等属性值,形成一个个 ArgumentValue ,并把他们的集合存放到 ArgumentValues中去, 然后把这个 ArgumentValues 添加到bean中。
理所当然的,beanDefinition中要添加一些实例域 :
1 2 private ArgumentValues constructorArgumentValues; private PropertyValues propertyValues;
属性注入 前面已经做到了通过 XmlBeanDefinitionReader来读取想要注入的属性和属性值。那么只是获取了而已,还没有注入到bean中去。
怎么把它作为 Bean 的属性注入进去呢?
这要求我们在创建 Bean 的时候就要做相应的处理,给属性赋值。针对 XML 配置的 Value 值,我们要按照数据类型分别将它们解析为字符串、整型、浮点型等基本类型。在 SimpleBeanFactory 类中,创建creatbean。
1 2 3 4 5 6 7 8 9 10 11 12 13 14 15 16 17 18 19 20 21 22 23 24 private Object createBean (BeanDefinition bd) { Class<?> clz = null ; Object obj = doCreateBean(bd); this .earlySingletonObjects.put(bd.getId(), obj); try { clz = Class.forName(bd.getClassName()); } catch (ClassNotFoundException e) { e.printStackTrace(); } handleProperties(bd, clz, obj); return obj; }
具体的 doCreateBean() 与 handleProperties()的实现 :
如何处理 constructor?
首先,获取 XML 配置中的属性值,这个时候它们都是通用的 Object 类型,我们需要根据 type 字段的定义判断不同 Value 所属的类型,作为一个原始的实现这里我们只提供了 String、Integer 和 int 三种类型的判断。最终通过反射构造对象,将配置的属性值注入到了 Bean 对象中,实现构造器注入。
1 2 3 4 5 6 7 8 9 10 11 12 13 14 15 16 17 18 19 20 21 22 23 24 25 26 27 28 29 30 31 32 33 34 35 36 37 38 39 40 41 42 43 44 45 46 47 48 49 50 51 52 53 54 55 56 57 58 59 60 61 62 63 64 65 66 private Object doCreateBean (BeanDefinition bd) { Class<?> clz = null ; Object obj = null ; Constructor<?> con = null ; try { clz = Class.forName(bd.getClassName()); ArgumentValues argumentValues = bd.getConstructorArgumentValues(); if (!argumentValues.isEmpty()) { Class<?>[] paramTypes = new Class <?>[argumentValues.getArgumentCount()]; Object[] paramValues = new Object [argumentValues.getArgumentCount()]; for (int i=0 ; i<argumentValues.getArgumentCount(); i++) { ArgumentValue argumentValue = argumentValues.getIndexedArgumentValue(i); if ("String" .equals(argumentValue.getType()) || "java.lang.String" .equals(argumentValue.getType())) { paramTypes[i] = String.class; paramValues[i] = argumentValue.getValue(); } else if ("Integer" .equals(argumentValue.getType()) || "java.lang.Integer" .equals(argumentValue.getType())) { paramTypes[i] = Integer.class; paramValues[i] = Integer.valueOf((String) argumentValue.getValue()); } else if ("int" .equals(argumentValue.getType())) { paramTypes[i] = int .class; paramValues[i] = Integer.valueOf((String) argumentValue.getValue()).intValue(); } else { paramTypes[i] = String.class; paramValues[i] = argumentValue.getValue(); } } try { con = clz.getConstructor(paramTypes); obj = con.newInstance(paramValues); } catch (NoSuchMethodException e) { e.printStackTrace(); } catch (SecurityException e) { e.printStackTrace(); } catch (IllegalArgumentException e) { e.printStackTrace(); } catch (InvocationTargetException e) { e.printStackTrace(); } } else { obj = clz.newInstance(); } } catch (InstantiationException e) { e.printStackTrace(); } catch (IllegalAccessException e) { e.printStackTrace(); } catch (ClassNotFoundException e) { e.printStackTrace(); } System.out.println(bd.getId() + " bean created. " + bd.getClassName() + " : " + obj.toString()); return obj; }
如何处理 property?和处理 constructor 相同,我们依然要通过 type 字段确定 Value 的归属类型。但不同之处在于,判断好归属类型后,我们还要手动构造 setter 方法,通过反射将属性值注入到 setter 方法之中。通过这种方式来实现对属性的赋值。
其实代码的核心是通过 Java 的反射机制调用构造器及 setter 方法,在调用过程中根据具体的类型把属性值作为一个参数赋值进去。这也是所有的框架在实现 IoC 时的思路。
反射技术是 IoC 容器赖以工作的基础。
1 2 3 4 5 6 7 8 9 10 11 12 13 14 15 16 17 18 19 20 21 22 23 24 25 26 27 28 29 30 31 32 33 34 35 36 37 38 39 40 41 42 43 44 45 46 47 48 49 50 51 52 53 54 55 56 57 58 59 60 61 62 63 64 65 66 67 68 69 70 71 private void handleProperties (BeanDefinition bd, Class<?> clz, Object obj) { System.out.println("handle properties for bean : " + bd.getId()); PropertyValues propertyValues = bd.getPropertyValues(); if (!propertyValues.isEmpty()) { for (int i=0 ; i<propertyValues.size(); i++) { PropertyValue propertyValue = propertyValues.getPropertyValueList().get(i); String pName = propertyValue.getName(); String pType = propertyValue.getType(); Object pValue = propertyValue.getValue(); boolean isRef = propertyValue.getIsRef(); Class<?>[] paramTypes = new Class <?>[1 ]; Object[] paramValues = new Object [1 ]; if (!isRef) { if ("String" .equals(pType) || "java.lang.String" .equals(pType)) { paramTypes[0 ] = String.class; } else if ("Integer" .equals(pType) || "java.lang.Integer" .equals(pType)) { paramTypes[0 ] = Integer.class; } else if ("int" .equals(pType)) { paramTypes[0 ] = int .class; } else { paramTypes[0 ] = String.class; } paramValues[0 ] = pValue; } else { try { paramTypes[0 ] = Class.forName(pType); } catch (ClassNotFoundException e) { e.printStackTrace(); } try { paramValues[0 ] = getBean((String)pValue); } catch (BeansException e) { e.printStackTrace(); } } String methodName = "set" + pName.substring(0 ,1 ).toUpperCase() + pName.substring(1 ); Method method = null ; try { method = clz.getMethod(methodName, paramTypes); } catch (NoSuchMethodException e) { e.printStackTrace(); } catch (SecurityException e) { e.printStackTrace(); } try { method.invoke(obj, paramValues); } catch (IllegalAccessException e) { e.printStackTrace(); } catch (IllegalArgumentException e) { e.printStackTrace(); } catch (InvocationTargetException e) { e.printStackTrace(); } } } }
实现值的注入 如果说有这样一个配置文件 :
1 2 3 4 5 6 7 8 9 <?xml version="1.0" encoding="UTF-8" ?> <beans > <bean id ="aservice" class ="com.minis.test.AServiceImpl" > <constructor-arg type ="String" name ="name" value ="abc" /> <constructor-arg type ="int" name ="level" value ="3" /> <property type ="String" name ="property1" value ="Someone says" /> <property type ="String" name ="property2" value ="Hello World!" /> </bean > </beans >
那么和上面的配置属性对应,在测试类 AServiceImpl 中,要有相应的 name、level、property1、property2 字段来建立映射关系,这些实现体现在构造函数 以及 settter、getter 等方法中。
1 2 3 4 5 6 7 8 9 10 11 12 13 14 15 16 17 18 public class AServiceImpl implements AService { private String name; private int level; private String property1; private String property2; public AServiceImpl () { } public AServiceImpl (String name, int level) { this .name = name; this .level = level; System.out.println(this .name + "," + this .level); } public void sayHello () { System.out.println(this .property1 + "," + this .property2); } }